Introduction: Why Editing Matters
Anyone can trim a clip, slap on a transition, and call it a video. But that’s not storytelling—it’s just assembly. The gap between a rough cut and a professional edit is where attention lives and dies. Polished editing doesn’t just clean things up; it controls the rhythm, builds the mood, and delivers meaning. Great cuts anticipate emotion. They keep viewers in the flow, even when nothing flashy is happening.
This is what most hobbyists miss: editing isn’t just what you do at the end. It is the story-shaping process. If you’re just lining clips up chronologically, you’re probably losing people halfway through. Pros ask questions at every turn: Does this scene earn its time? Could a quick b-roll cut keep it tighter? Should the music swell here—or drop out for impact?
In 2024, where audience habits shift by the second, editing is your last line of defense against the scroll. It’s what separates a forgettable vlog from a memorable narrative. Learning to cut with intent is the difference between a side project and a real presence online.
Step 1: Organize Your Footage
Before you touch the timeline, get your house in order. Import your clips with intention. Rename files as you bring them in—no one wants to decode a folder full of “C0003456.MP4” at midnight. Take 10 minutes up front to label by shoot day, camera angle, or subject. It’ll save you hours later.
Next, build a clean folder structure. At minimum, separate raw footage, audio files, b-roll, graphics, and exports. Most editing software lets you create bins—use them. Group clips by scene or segment so you’re not hunting mid-project. It sounds tedious, but it’s make-or-break once your project grows past a simple vlog.
Think of it this way: pros don’t scroll through chaos. They navigate. Your work should be so organized that someone else could step in and find what they need in seconds. You don’t need to over-engineer it—just keep it tight, obvious, and consistent.
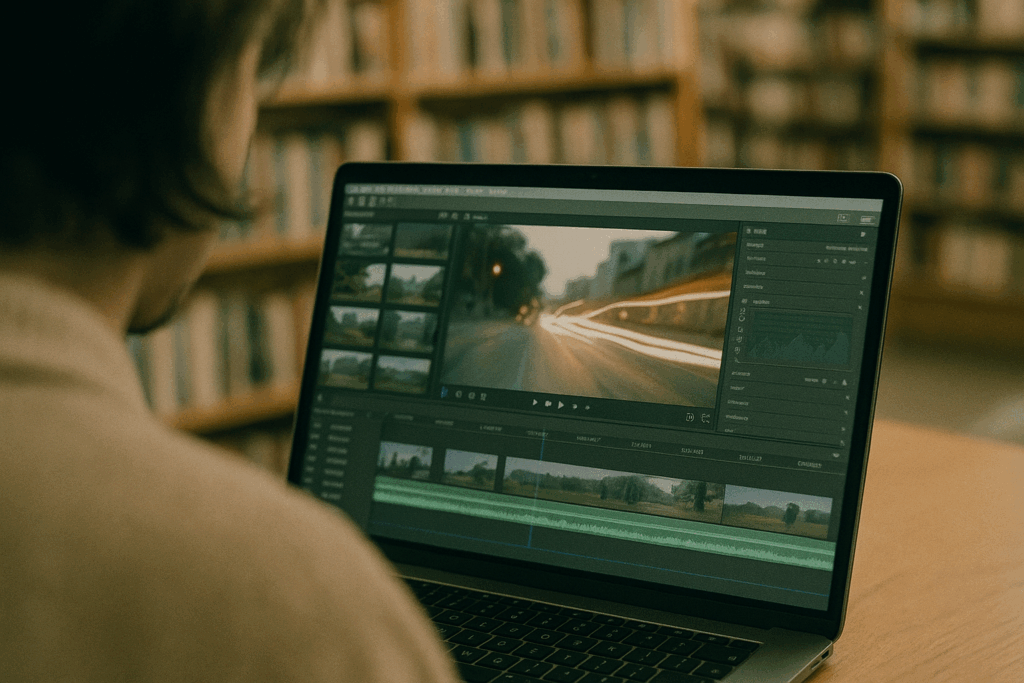
Step 2: Choose the Right Editing Software
Before you dive into editing, it’s crucial to pick the software that fits your style, budget, and experience level. The right tool can increase your efficiency and elevate the polish of your final product.
Popular Editing Platforms
Here’s a breakdown of the top editing platforms trusted by professional creators:
- Final Cut Pro (Mac only):
- Streamlined interface and fast rendering
- Optimized for Apple Silicon processors
- Great for solo creators and content with tight turnarounds
- Adobe Premiere Pro (Mac & Windows):
- Industry standard for long-form and commercial work
- Seamless integration with After Effects, Audition, and Photoshop
- Flexible for every type of project, from vlogs to films
- DaVinci Resolve (Mac, Windows, Linux):
- Free version offers powerful tools
- Known for top-tier color grading and built-in audio suite
- Excellent choice for creators who want pro features without the monthly cost
What to Choose Based on Skill Level
- Beginner:
- Start with DaVinci Resolve (free version) or iMovie for Mac users
- Look for drag-and-drop timelines, auto-sync audio features, and built-in templates
- Intermediate to Advanced:
- Premiere Pro or Final Cut Pro offer more control and customization
- Ideal for editing multiple camera setups, narrative sequences, or branded content
A Quick Note on Mobile vs. Desktop Editing
Mobile editing is increasingly capable, but it still has limitations.
When mobile works:
- Quick social content (Stories, Reels, Shorts)
- Traveling without access to your full setup
When desktop is better:
- Anything requiring multiple layers, precise cuts, color grading, or advanced audio work
- Larger projects that demand better processing power and storage
Bottom line: Start with what you have, but as your workflow grows, upgrading your tools can make a meaningful difference in both speed and quality.
Step 3: Build Your Story With a Rough Cut
Before the polish comes the framework. The rough cut is where your video begins to take shape—it’s all about clarity, structure, and pacing. Think of this stage as assembling the bones before you add the skin.
Focus on the A-Roll First
Your A-roll is the core narrative—talking head footage, interviews, or any clip where the story is being told.
- Sort your A-roll chronologically or by topic
- Lay down only the essential clips that tell your main story
- Avoid worrying about perfection in this phase—just focus on flow
Trim Ruthlessly
One of the most common rookie mistakes is keeping too much. Good editors know what to delete.
- Cut out long pauses, repeated takes, and filler words
- Look for moments where pacing drags and tighten them
- Aim for momentum—every second should give the viewer a reason to keep watching
Layer in B-Roll and Cutaways
Once your structure is solid, start layering visual variety. This isn’t just aesthetic—it’s functional.
- Use b-roll to illustrate what’s being said
- Add cutaways to hide jump cuts or inject energy
- Mix in relevant visuals like hands at work, environment shots, or reaction shots
By the end of your rough cut, your story should be clear and compelling—even if it’s not yet polished. Don’t skip this phase; it’s the blueprint for everything that follows.
Step 4: Master Your Transitions
Transitions can either make your edit flow or feel like a patchwork. More often than not, the cleanest solution is the best one. Hard cuts—simple, fast, and invisible—should be your default. They don’t draw attention to themselves, which keeps your audience focused on the story, not the edit.
That said, there are moments when a more stylized transition earns its place. Use crossfades to denote a passage of time or soften the cut between emotionally heavy scenes. Wipes and motion transitions can work for quick, energetic cuts—think action sequences, travel vlogs, or anything with high visual tempo. Just don’t overuse them. If every cut is trying to impress, you end up with chaos.
What separates amateur from pro work is intention. Ask: why am I using this transition? Does it match the tone of the video? One practical example—many creators use a zoom blur for fast-paced tutorials to jump between steps. In contrast, lifestyle vloggers often stick to clean jump cuts interspersed with subtle crossfades for meal prep, organizing, or day-in-the-life content.
For deeper guidance, check out Using Transitions to Create Seamless Video Flow.
Step 5: Audio First, Always
Audio makes or breaks your edit—don’t treat it like an afterthought. Start by clearing the clutter. Use noise reduction tools to cut out buzzing ceiling fans, street noise, or random shuffles. If there’s laughter or off-mic reactions drowning out key dialogue, fade it back or cut it entirely. Clean audio keeps your message sharp.
Next, sync your sound. If you’re using external audio (like a lav mic or field recorder), line it up with the visuals immediately. Most pro editors sync manually or use software that aligns waveforms—it’s worth the extra step to avoid jarring mismatches.
Then, layer in your background music. Keep it subtle. Your music should lift the tone, not overpower your voice. Balance levels carefully—your dialogue is the star here. The same rule goes for sound effects: use them to emphasize, not distract. A well-placed swoosh or click adds polish. A constant barrage of noises? Exhausting.
Dial everything in until it sounds like a complete experience, not a pile of audio tracks fighting for attention.
Step 6: Color Correction and Grading
Your footage can be sharp, well-paced, and tightly edited—but if your colors don’t line up, the whole thing feels off. Consistency is king here. Match your shots so they look like they belong in the same world. Start by making sure whites are white, blacks are black. That means checking your exposure, white balance, and saturation for each clip, and adjusting until you’re not jumping from cool blues to warm oranges mid-scene.
Use the basic color tools first: sliders for temperature, contrast, highlights. Don’t overcomplicate. It’s about correction, not reinvention. Once your shots are in sync, you can layer on enhancements—this is where LUTs come in. Think of a LUT (Look-Up Table) as a filter with brains. It gives your video a distinct tone, mood, or stylistic twist. But watch your step. A good LUT elevates. A bad one distracts. Keep it subtle. The goal is to enhance your story, not drown it in teal-and-orange cliches.
Step 7: Titles, Graphics, and Subtitles
Adding text and graphics to a video isn’t just a visual extra—it’s a critical layer of communication. Done right, these elements reinforce your message, improve viewer retention, and boost accessibility.
Keep Fonts Readable and On-Brand
Your font choices say a lot about your content. Whether you’re creating a fun lifestyle vlog or a professional tutorial, the design should be:
- Legible on any screen size (especially mobile)
- Consistent with your brand colors and style
- Sized appropriately—avoid titles that dominate the frame or get lost in the background
Stick with one or two font styles across your video to keep things clean. Too much variation creates distraction, not dynamism.
Use Lower Thirds Effectively
Lower thirds are small text elements usually placed in the lower third of the screen. They’re ideal for:
- Introducing speakers
- Providing context (like location or subject names)
- Highlighting key facts or timestamps
Remember to fade them in and out smoothly and keep them on screen just long enough for viewers to read without rushing.
Why Subtitles Matter
Subtitles serve more than one purpose:
- Accessibility: They make your content viewable by deaf and hard-of-hearing audiences.
- Engagement: Many viewers watch with the sound off—especially on mobile.
- SEO boost: On some platforms, captions improve discoverability.
Aim for accurate, well-timed subtitles that match your spoken words. You can auto-generate them as a starting point, but manual editing is key to professionalism.
Quick Tip:
If you’re posting on platforms like YouTube, upload a subtitle file rather than relying solely on auto-captions. This gives you more control and ensures better accuracy.
Step 8: Export Settings That Don’t Trash Quality
Let’s keep it simple: resolution is the size of your video (1080p is standard, 4K is crisp but heavier). Bitrate controls how much data is used per second of video—higher bitrate means better quality but bigger files. And format? Stick to MP4 with H.264 codec—it’s the industry’s go-to for speed, compatibility, and decent compression.
Now, presets make life easier. For YouTube, 1080p at 10-15 Mbps is solid. If you’re delivering in 4K, bump it up to around 35-45 Mbps. Instagram? Square (1080×1080) or vertical (1080×1920) works best, and lower bitrates like 8-10 Mbps help with upload speed without a big quality hit. TikTok favors vertical resolution only, 1080×1920, with bitrates around 5-8 Mbps for fast loading.
Compression is about finding that middle ground—don’t max out your quality at the cost of file size. Use a tool like HandBrake or Media Encoder to shave off bulk without killing clarity. Export one version, test it on your phone and desktop, and only then hit upload. Deliver clean, not bloated.
Final Checks Before You Publish
Watch your final edit all the way through—twice. Then once more.
It’s easy to miss small mistakes when you’ve been staring at the timeline for hours. A jump cut that doesn’t feel right, a color shift between scenes, or an awkward audio fade will show up under fresh eyes. Don’t trust your memory; trust repeated viewing.
Next, scan every title, caption, and graphic. Look for spelling errors, spacing issues, and font inconsistencies. These small details are the difference between amateur and professional. Your audience might not notice flawless design, but they will spot typos instantly—and they remember them.
Lastly, run the audio through headphones. What sounds fine through speakers might hide glitches, hums, or messy transitions in the mix. Headphones give you detail. You’ll hear if your background music overwhelms your voice or if that hard cut sounds harsh. Clean it up now, before the audience hears it first.
This is your last chance to tighten up the work before it’s live. Run it like a final check on a mission-critical system. Clean, sharp, no surprises.
Conclusion: From Clips to Impact
Editing isn’t just technical polish—it’s how you shape the story you want to tell. Every cut, fade, and frame says something. The tone of your content, the pace of your delivery, the mood you’re building—all of it stems from tiny editing decisions that stack up fast. Forget the myth that you need a full production team. What you actually need is clarity, focus, and reps.
No one nails it on the first try. The creators who stand out in 2024 are the ones who take time to learn the craft, test ideas, and repeat what works without getting stuck in formula. Tinker. Scrap a draft. Try again with tighter cuts or a sharper hook. This is the part where good videos become great.
The editors who win are the ones who treat the process like a conversation with their audience—not a checklist. So, keep it lean, stay curious, and above all, make every second count.
 As a co-founder of vlogedgevault Zorien Quenthos combines technical expertise with visionary leadership. His contributions spotlight the latest innovations in media technology, ensuring the platform remains a trusted hub for vloggers and digital creators.